
As an Amazon Associate, I earn from qualifying purchases.
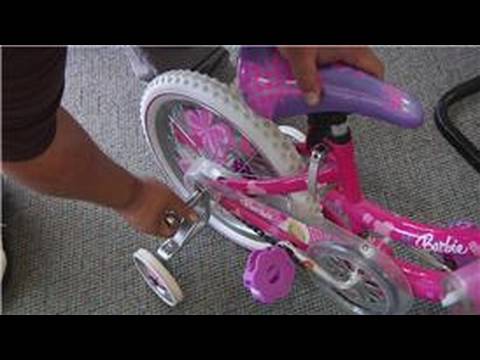
To put training wheels on a bike, begin by securing the brackets onto the rear axle of the bicycle. Then, attach the training wheels to the brackets using screws or bolts, ensuring they are secured tightly.
Finally, make any necessary adjustments to ensure that the wheels are straight and balanced before allowing the rider to use the bike with training wheels.
Step-by-step Guide On Installing Training Wheels
Teaching a child how to ride a bike is a memorable milestone in their life. When it comes to ensuring their safety and stability, training wheels play a crucial role. Installing training wheels on a bike is a simple process that can be done at home. In this step-by-step guide, we will walk you through the process of installing training wheels on a bike so that you can help your little one gain confidence and develop their balance skills.
Gather The Necessary Tools And Materials
Before you begin installing the training wheels, it’s important to gather all the necessary tools and materials. This will ensure a smooth and efficient process. Here’s a list of what you’ll need:
| Tools | Materials |
|---|---|
| Wrench | Training wheels |
| Adjustable pliers | Washers |
| Allen wrench | Nuts and bolts |
Prepare The Bike For Installation
Before attaching the training wheels, it’s essential to prepare the bike for installation. Follow these steps:
Check tire pressure
Ensure that the bike tires are properly inflated. This will provide stability and support to the bike when the training wheels are attached.
Adjust seat height
Position the bike seat at a suitable height for your child. The seat should be high enough for them to comfortably reach the pedals but low enough for them to touch the ground with their feet.
Secure the bike
Place the bike on a flat and stable surface. Make sure it is secure and won’t move during the installation process.
Attach The Training Wheels
Now it’s time to attach the training wheels. Follow these steps:
Position the training wheels correctly
Place the training wheels on the rear axle of the bike. Make sure they are evenly positioned on both sides of the wheel.
Align the training wheels with the bike frame
Ensure that the training wheels are parallel to the bike frame. This will provide maximum stability when the bike is in motion.
Tighten the nuts and bolts
Using the appropriate wrench or pliers, tighten the nuts and bolts that hold the training wheels in place. Make sure they are securely fastened to avoid any accidents or wobbling.
Adjust The Training Wheels
Once the training wheels are attached, it’s important to make some adjustments to ensure optimal stability and balance. Follow these steps:
Ensure the training wheels are level
Check that both training wheels are at the same height and level with the ground. This will provide a stable base for your child to learn and practice.
Adjust the height of the training wheels
If needed, you can adjust the height of the training wheels to gradually increase or decrease the support they provide. Start with a higher position to provide more stability and gradually lower them as your child gains confidence.
Test The Stability Of The Bike With The Training Wheels
Once everything is properly adjusted, it’s time to test the stability of the bike with the training wheels. Allow your child to sit on the bike and practice pedaling and steering. Observe their balance and make any necessary adjustments to ensure they feel comfortable and secure.
Teach Your Child To Ride With Training Wheels
Now that the bike is ready, it’s important to guide your child in learning how to ride with training wheels. Follow these steps:
Guide them on the basics of pedaling and steering
Show your child how to pedal and steer the bike. Encourage them to practice these movements to develop their coordination.
Encourage balance and confidence
Support your child in finding their balance while riding. Encourage them to trust their abilities and build their confidence as they become more comfortable on the bike.
Gradually raise the training wheels
As your child becomes more confident and shows progress in their balance skills, gradually raise the training wheels. This will allow them to experience a little less support and start developing their balancing abilities.
Monitor Progress And Make Adjustments
Throughout the learning process, it’s important to observe your child’s riding skills and make any necessary adjustments. This can include raising or lowering the training wheels, adjusting the bike seat height, or providing guidance and support as needed.
Transitioning To Riding Without Training Wheels
Once your child has gained enough confidence and balance with the training wheels, it’s time to transition to riding without them. Follow these steps:
Practice balancing without training wheels
Encourage your child to practice balancing without the training wheels. This can be done by lifting their feet off the ground slightly and trying to maintain balance for short intervals of time.
Gradually remove training wheels completely
When your child is ready, remove the training wheels completely. Support them by holding onto the back of the bike seat or using a handle on their bike. Gradually decrease your support as they become more comfortable.
Support your child during the transition period
During the transition period, it’s important to provide continuous support and guidance. Be there to catch them if they lose balance and encourage them to keep practicing until they can confidently ride without training wheels.
With this step-by-step guide, you can easily install training wheels on a bike and assist your child in learning how to ride. Remember to prioritize safety, monitor your child’s progress, and provide continuous support throughout the journey. Before you know it, your little one will be riding confidently on their own!
Credit: m.youtube.com
Frequently Asked Questions Of How To Put Training Wheels On A Bike
Can You Attach Training Wheels To Any Bike?
Yes, training wheels can be attached to any bike.
How Do You Put Training Wheels Back On A Bike?
To put training wheels back on a bike, first, remove the rear wheel axle nuts or quick release skewer. Then, insert the training wheel brackets onto the axle, making sure they are aligned. Secure them with the nuts or skewer and tighten.
Finally, adjust the height of the wheels as needed.
How Do You Hook Up Training Wheels?
To hook up training wheels, follow these steps: 1. Lower the bike seat and remove the pedals. 2. Attach the training wheel to the rear axle of the bike. 3. Insert the included washer and tighten the nut by hand. 4. Make sure the training wheel is securely in place by using a wrench to fully tighten the nut. Next, check the bike’s stability and make any necessary adjustments to ensure the wheel is level. If needed, raise handlebars on specialized bike to provide a more comfortable riding position for the learner.
Make sure the training wheel is level and not touching the ground. 5. Test the bike to ensure stability before riding.
Conclusion
Adding training wheels to a bike is a simple and easy process that provides stability and confidence for young riders. By following the steps outlined in this guide, you can ensure a safe and effective installation. Remember to adjust the training wheels properly, tighten the bolts securely, and test the bike for stability before letting your child ride.
With training wheels in place, your child can enjoy the thrill of cycling while building their skills and confidence. Happy riding!

Leave a Reply